
Thursday, May 29, 2014

Wednesday, February 5, 2014
February flour sack towel...
Decided to give these a "what happens in my kitchen" theme. So here's the first - laundry!

6 to go. I'm thinking brewing, chatting, eating, cooking, cleaning.... And I'm sure I'll think of something else eventually!
Saturday, February 1, 2014
A pinch and a punch...
For the FIRST of the month! (This is a silly thing my husband and I always do, I usually remember first so he catches it!)
All my January projects got finished, which I was amazed and pleased about! So, onto this month...
Being as it's a shorter month I'm lowering my sights just a little...
Project 1: February Mug Rug. Another Patchsmith design, this time with a Valentine's theme. Really, really need to get crack-a-lacking on this one!

Project 2: Appliqued Dish Towels. I don't have a picture of these as the idea is ever so slightly invented. Ha! That's going to go well then... ;)
Project 3: Chair Back Pockets (by Jacob's request). Jacob & Leo have a little table and two chairs in our living room and Jacob wants to be able to put colouring books into the pockets.

All my January projects got finished, which I was amazed and pleased about! So, onto this month...
Being as it's a shorter month I'm lowering my sights just a little...
Project 1: February Mug Rug. Another Patchsmith design, this time with a Valentine's theme. Really, really need to get crack-a-lacking on this one!
Project 2: Appliqued Dish Towels. I don't have a picture of these as the idea is ever so slightly invented. Ha! That's going to go well then... ;)
Project 3: Chair Back Pockets (by Jacob's request). Jacob & Leo have a little table and two chairs in our living room and Jacob wants to be able to put colouring books into the pockets.
Wednesday, January 29, 2014
Stick a fork in me... January!
All my targets met! More details tomorrow. And February targets too, maybe, if I have decided!

Sunday, January 26, 2014
January progress report
Scrapbooking Supplies organisation: DONE! (See earlier blog post!)
Table Topper: Top of the quilt is DONE! I have decided to use fleece for the backing but I am about 1/2" short (VERY ANNOYING) so I plan to buy new today. Bah! This always happens! I had a few problems with joining all my pieces together - probably my measurements were off. I definitely need practice on my 1/4" seam.

Knit House purse: Front is DONE, working on the back! I tried to figure out knitting in different colours within the same row myself and it was a disaster so I googled intarsia & started again. That made it better but I definitely need more practice with that technique.
Here is the front in progress:

In dire need of blocking! I was going to do the purse lining this morning but I can't find the zip I bought! It's just not my morning for projects I suspect.
I also made a mug rug:
 From a pattern by The Patchsmith on Craftsy. Seriously addicted to making those, I already have the next one lined up.
Table Topper: Top of the quilt is DONE! I have decided to use fleece for the backing but I am about 1/2" short (VERY ANNOYING) so I plan to buy new today. Bah! This always happens! I had a few problems with joining all my pieces together - probably my measurements were off. I definitely need practice on my 1/4" seam.
Knit House purse: Front is DONE, working on the back! I tried to figure out knitting in different colours within the same row myself and it was a disaster so I googled intarsia & started again. That made it better but I definitely need more practice with that technique.
Here is the front in progress:
In dire need of blocking! I was going to do the purse lining this morning but I can't find the zip I bought! It's just not my morning for projects I suspect.
I also made a mug rug:
And of course the piggy hat!
Stay tuned for *hopefully* finished projects and new targets for February!
Stay tuned for *hopefully* finished projects and new targets for February!
Tuesday, January 7, 2014
22 slightly wonky House Blocks!
All ready to make the corner pinwheel blocks!

There is one house block with an extremely iffy skyline but I will try to make it work! This fabric line (Riley Blake's Twice as Nice) has a bit of beige in it so I am not worried anymore about missing the green.

There is one house block with an extremely iffy skyline but I will try to make it work! This fabric line (Riley Blake's Twice as Nice) has a bit of beige in it so I am not worried anymore about missing the green.
Monday, January 6, 2014

Pink Piggy Hat
I have made this for my friend Laura who loves pigs. It was really fun to make and the book is brilliant - Animal Hats by Vanessa Mooncie. I've also made a children's chicken hat and I plan to make a cat & a frog in the near future.

Too many projects, too little time!
Too many projects, too little time!
Sunday, January 5, 2014
A Mug Rug
Well I was perhaps a little optimistic in my project planning as I still had two projects on the go which needed finished... I have now finished both but I will have to wait on posting the first as it is a birthday gift!

From this excellent pattern (great value too!). This was my first attempt at applique and I learned a lot. The finishing (particularly the binding) is a bit rubbish but I am still pretty pleased with it!
Jacob has requested chair back pockets to be made ASAP. So I'd better get cracking with my January projects!

From this excellent pattern (great value too!). This was my first attempt at applique and I learned a lot. The finishing (particularly the binding) is a bit rubbish but I am still pretty pleased with it!
Jacob has requested chair back pockets to be made ASAP. So I'd better get cracking with my January projects!
Wednesday, January 1, 2014
January Projects
After a fairly hectic few months getting ready for Christmas, I am ready to do some projects for fun!
First up: A sewing project! I found this tutorial on Moda Bake Shop & I am raring to have a go. I love table toppers because you can move them really easily - which is really important with two (three?) messy boys in my house.

Isn't it lovely?I picked up this fabric:
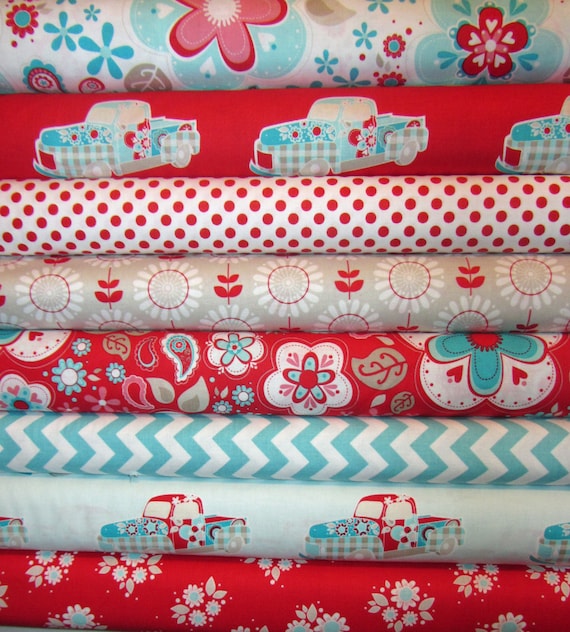
for a steal at Spice Berry Cottage on Etsy. I know I am short on the green but I have *ahem* quite a bit of fabric lying around if I need to add bits in.
I am also working on my knitting so I might try to get my head around colour changes with this awesome free pattern I found on Craftsy:

What projects do you have in mind for January? Fancy setting some targets with me? My plan is to get the above done by January 31st, ready for a new set of projects in February! Join me!
Saturday, November 2, 2013
Amped Up!
I know I've been AWOL... believe me, I've not be idle!
For now though I just wanted to share a quick post about the My Digital Studio challenges going on right now at the MDS Blog. I had a go at the first one, with the kit "Amped Up Ampersands". Today they have a FREE stamp brush set to download so be sure to check it out!

This is a little tag enclosing a Lego Minifig package for each of my nephews. I love choosing & giving gifts and usually I tie one of these minifigure packs to my tag, but I thought I'd try something different this year and make it a mini gift all of its own! When I saw the kit "Amped Up Ampersands" I thought it'd be perfect for just adding that little extra...

The tag measures 3.5" x 9.5" when printed, you just score it at 4.5" and 5" to get the little enclosure, then tie your ribbon through punched holes & the Minifig package itself. Voila!
For now though I just wanted to share a quick post about the My Digital Studio challenges going on right now at the MDS Blog. I had a go at the first one, with the kit "Amped Up Ampersands". Today they have a FREE stamp brush set to download so be sure to check it out!

This is a little tag enclosing a Lego Minifig package for each of my nephews. I love choosing & giving gifts and usually I tie one of these minifigure packs to my tag, but I thought I'd try something different this year and make it a mini gift all of its own! When I saw the kit "Amped Up Ampersands" I thought it'd be perfect for just adding that little extra...

The tag measures 3.5" x 9.5" when printed, you just score it at 4.5" and 5" to get the little enclosure, then tie your ribbon through punched holes & the Minifig package itself. Voila!
Sunday, August 18, 2013
Googly Tags
This is a guest blog post for my sister's shop, Millymog (her blog is here).
Hello! My name is Bexx and I am Emma's much younger sister (Sorry Em, couldn't resist!). I live in Southern Maryland with my husband, two little boys & cat. I occasionally help Emma out tweaking images for the Millymog website but more often you can find me sewing, knitting, crocheting or papercrafting. Emma asked me if I would share an easy craft project on her blog, so here it is!
When we were kids, our mum & dad would wrap our Christmas presents and separate them out in the living room. Our older brother Richard's presents would be on one chair, mine on another, and Emma's on the sofa. However, they would NEVER EVER have tags on them, so usually at least twice on Christmas morning, a non-plussed Emma would open up some underpants, or Richard would be stunned by a beautiful make-up set. I am now a huge fan of using gift tags, one per gift.
I'm going to share with you today how I whip up cute and easy gift tags for all occasions. They don't need a lot of fancy equipment, although there are a few things that would be helpful, if you REALLY get into making tags.
Step 1: Make or buy your tag. You can usually buy luggage labels from WHSmith, or from places like Amazon or eBay. If you've bought them, skip to step 2. However, if you want to make them super personalised, it isn't difficult. First up, find some good card. I like to use neutral colours so that when you're writing them, you don't need a fancy pen. But coloured card also looks awesome.

Next, you need to cut your card to about 10cm x 5cm, or 4in x 2in. Then, mark a spot in the middle near the top of your tag. That's where your string is going to go.

If you want to reinforce the hole, punch out two 1/2" circles and stick them over the dot. You can use any colour for this, cheerier the better!

You then need to punch your hole in the tag. A standard office hole punch works perfectly for this, or if you have a craft punch, that works too. Just make sure that, if you used reinforcement, you wait until the glue has dried. Otherwise your punch is going to mangle the whole thing up.
Next, you need to add your string. I use a lot of baker's twine - it's cheap, readily available & cheery! But you could use garden twine for a rustic look, wool if you have it lying around, anything really. You need to fold your length of string in half, poke the loop through the hole, then string the ends through the loop. You just made a Lark's Head knot, former scouts & guides!!

Step 2: Stamp your image on your tag. I used a stamp set called Fox & Friends from Stampin' Up!, but you could use anything with eyes. I also used Stampin' Up! ink as I have it on hand, but there are lots of different brands available from craft shops.

Step 3: Take your googly eyes (get them from that craft shop we mentioned, or raid your kids' art box, or sometimes you can find them in haberdasheries) and glue them on. You're all done! Easy eh?

Step 4: Run with the concept and make tags for all occasions. Here's a Hallowe'en tag using exactly the same idea, and a Christmas tag to which I added a couple of jingly bells and replaced the googly eyes with glitter glue.

I've enjoyed blogging with you today. I'd love to see your tags - check out my own blog, the Dented Spoon, if you'd like to share your tags with me, or to see more ideas.
Bexx xxxxxx
Hello! My name is Bexx and I am Emma's much younger sister (Sorry Em, couldn't resist!). I live in Southern Maryland with my husband, two little boys & cat. I occasionally help Emma out tweaking images for the Millymog website but more often you can find me sewing, knitting, crocheting or papercrafting. Emma asked me if I would share an easy craft project on her blog, so here it is!
When we were kids, our mum & dad would wrap our Christmas presents and separate them out in the living room. Our older brother Richard's presents would be on one chair, mine on another, and Emma's on the sofa. However, they would NEVER EVER have tags on them, so usually at least twice on Christmas morning, a non-plussed Emma would open up some underpants, or Richard would be stunned by a beautiful make-up set. I am now a huge fan of using gift tags, one per gift.
I'm going to share with you today how I whip up cute and easy gift tags for all occasions. They don't need a lot of fancy equipment, although there are a few things that would be helpful, if you REALLY get into making tags.
Step 1: Make or buy your tag. You can usually buy luggage labels from WHSmith, or from places like Amazon or eBay. If you've bought them, skip to step 2. However, if you want to make them super personalised, it isn't difficult. First up, find some good card. I like to use neutral colours so that when you're writing them, you don't need a fancy pen. But coloured card also looks awesome.

Next, you need to cut your card to about 10cm x 5cm, or 4in x 2in. Then, mark a spot in the middle near the top of your tag. That's where your string is going to go.

If you want to reinforce the hole, punch out two 1/2" circles and stick them over the dot. You can use any colour for this, cheerier the better!

You then need to punch your hole in the tag. A standard office hole punch works perfectly for this, or if you have a craft punch, that works too. Just make sure that, if you used reinforcement, you wait until the glue has dried. Otherwise your punch is going to mangle the whole thing up.
Next, you need to add your string. I use a lot of baker's twine - it's cheap, readily available & cheery! But you could use garden twine for a rustic look, wool if you have it lying around, anything really. You need to fold your length of string in half, poke the loop through the hole, then string the ends through the loop. You just made a Lark's Head knot, former scouts & guides!!

Step 2: Stamp your image on your tag. I used a stamp set called Fox & Friends from Stampin' Up!, but you could use anything with eyes. I also used Stampin' Up! ink as I have it on hand, but there are lots of different brands available from craft shops.

Step 3: Take your googly eyes (get them from that craft shop we mentioned, or raid your kids' art box, or sometimes you can find them in haberdasheries) and glue them on. You're all done! Easy eh?

Step 4: Run with the concept and make tags for all occasions. Here's a Hallowe'en tag using exactly the same idea, and a Christmas tag to which I added a couple of jingly bells and replaced the googly eyes with glitter glue.

I've enjoyed blogging with you today. I'd love to see your tags - check out my own blog, the Dented Spoon, if you'd like to share your tags with me, or to see more ideas.
Bexx xxxxxx
Friday, April 19, 2013
Beautiful Basics match report!
Well, I did my FIRST CLASS today - Beautiful Basics!
My aim was to help people release their creativity by showing them how to START card making. So, we covered cutting cardstock, scoring, matting, making the most of your stamps, colour coordination... etc etc. It was great because as I got them to do all the cutting, I just put the stacks of paper out & let them loose! That probably wouldn't work with too many more people but I am going to limit numbers. In fact, I already have 3 sign-ups for the next class, Embossing Extravaganza! (May 23rd - more details to follow)

Janette (and Solomon!) fiddling with ribbon.

Laura working away!

Janette's cards. Didn't she do a fab job!?
 And Laura's cards! Can you believe it was her first time stamping?
It was lovely to stamp with friends today. I also did MORE stamping today, my upline Heather and I had a stamping lunch at Panera. I managed to get all of Jacob's (admittedly very simple - I'm ninja'd out!) thankyou cards done. All I have to do now is write them & mail them!
My aim was to help people release their creativity by showing them how to START card making. So, we covered cutting cardstock, scoring, matting, making the most of your stamps, colour coordination... etc etc. It was great because as I got them to do all the cutting, I just put the stacks of paper out & let them loose! That probably wouldn't work with too many more people but I am going to limit numbers. In fact, I already have 3 sign-ups for the next class, Embossing Extravaganza! (May 23rd - more details to follow)

Janette (and Solomon!) fiddling with ribbon.

Laura working away!

Janette's cards. Didn't she do a fab job!?

It was lovely to stamp with friends today. I also did MORE stamping today, my upline Heather and I had a stamping lunch at Panera. I managed to get all of Jacob's (admittedly very simple - I'm ninja'd out!) thankyou cards done. All I have to do now is write them & mail them!
Wednesday, April 17, 2013
Where WERE you Bexx?
So, looking at my blog last night I noticed it had been neglected for weeks earlier in late March/April. Well, I was very busy!
Both Jacob and Leo had the same due date (March 30th) however Jacob was 8 days overdue (April 7th 2008 he burst into the world!) and Leo was a planned c-section on March 27th 2012. So, both my boys have birthdays at around the same time. Well, as it was Leo's first birthday, I couldn't let that pass by unnoticed. And Jacob had his little heart set on a Ninjago party.
I thought I'd show a couple of pics from Leo's birthday tonight. I was inspired in the colour scheme by Stampin' Up!'s "Sent with Love" bundle.

I just love this paper & colour scheme! It'll be all gone come April 30th though so if you fancy it, you need to jump on it!


Cake pops! Took ages but tasted divine.

Cupcakes. Not my strength, but my 2013 resolution is to learn to cook a good cupcake. Without a packet mix!

The boys in the morning before the big do. Jacob chose the tunnel for his pressie for Leo. Leo was very puzzled by the whole concept!
I'll post a few more pics of what I've been up to in the last few weeks over the next few days.
Tuesday, April 16, 2013
Something slightly different!
I've been preparing for my Beautiful Basics class on Thursday (only two spots left!) and I thought I'd share the little handout I put together. It's full of hints & tips, such as guidelines for cutting & scoring cardstock, colour selection, matting, a few useful links, and all the details of the supplies I'll be using on Thursday.
Beautiful Basics Handout
I've tried to keep things very simple & used just one stamp set to create a versatile birthday card, a Christmas card and a fun general purpose card. It's a great starting point for newcomers to the craft & I know that more seasoned stampers would find the class interesting too. Here's a sneak peek:

I'll share some more pictures after Thursday. Don't want to steal my own thunder! Ha!
Beautiful Basics Handout
I've tried to keep things very simple & used just one stamp set to create a versatile birthday card, a Christmas card and a fun general purpose card. It's a great starting point for newcomers to the craft & I know that more seasoned stampers would find the class interesting too. Here's a sneak peek:

I'll share some more pictures after Thursday. Don't want to steal my own thunder! Ha!
Monday, April 15, 2013
Beautiful Basics & Balti....more!
Just a quick heads-up about Beautiful Basics on Thursday. I am going to attempt to teach the basics of stamping, and we will be making 3 gorgeous cards from scratch. Nope, I'm not going to do all the cutting. Nope, you will not get a lovely little stack of all the pieces you need. YOU are going to LEARN how to do all that, all using one versatile stamp set & punch. Doesn't that sound brill? Well, I still have 3 spots left. A reminder of the details:
OK so you have a few stamps, a bit of paper & some cardstock. How do you take the next step & turn them into gorgeous hand-made cards? This class is for you if:
- you bought stuff and now don't remember what to do with it (!)
- you want some fresh ideas for making the most of your stamps
- you just need a little prod in the right direction
- you just fancy stamping, chatting & giggling with friends
Class is $10 (this covers the cost of supplies) and you will come away with 3 gorgeous cards. Please bring your own scissors & adhesive. Place an order of $25 (before shipping & handling) and your class is HALF PRICE. Place an order of $50 (before shipping & handling) and your class is FREE. Can't say fairer than that! :D
I am going to have a sneak peek of one of the cards for you tomorrow. I'd love for you to join us so drop me a line if you're interested.
OK now another Baltimore snap! It was fabulous, and I am now really wanting to go to Convention. Sadly I can't this year, but I very much hope to be there in 2014!
 Yup - it had to be done! (l-r) my upline & awesome friend Heather, SHELLI GARDNER (!!!!!!) and me. (If you aren't a stamper, Shelli Gardner is one of the co-founders of Stampin' Up! and a lovely person. I don't hug strangers though!) Spot the Brit - clue, it's all in the teeth! My hair started off all swooshy & straight too, then I had to dash out to a very sunny but very windy Charm City and it all went wrong. However here's a pic of me "mainlining" before kick off, when my hair still looked good!

Beautiful Basics
Apr 18
10:00 AM
-
12:00 PM
(Eastern )
OK so you have a few stamps, a bit of paper & some cardstock. How do you take the next step & turn them into gorgeous hand-made cards? This class is for you if:
- you bought stuff and now don't remember what to do with it (!)
- you want some fresh ideas for making the most of your stamps
- you just need a little prod in the right direction
- you just fancy stamping, chatting & giggling with friends
Class is $10 (this covers the cost of supplies) and you will come away with 3 gorgeous cards. Please bring your own scissors & adhesive. Place an order of $25 (before shipping & handling) and your class is HALF PRICE. Place an order of $50 (before shipping & handling) and your class is FREE. Can't say fairer than that! :D
I am going to have a sneak peek of one of the cards for you tomorrow. I'd love for you to join us so drop me a line if you're interested.
OK now another Baltimore snap! It was fabulous, and I am now really wanting to go to Convention. Sadly I can't this year, but I very much hope to be there in 2014!


Please note, YES I am always that red! I have a naturally pink complexion & don't do makeup. Ever!
Do you like our lanyards? I sewed them with this fantastic tutorial! I fear the SU! fabric may not be around too much longer so if you have your eye on any of our beautiful designs, it might be a good time to stock up. But, what do I know!? :D
Right, enjoy your day, think of me as I catch up on chores I missed out on over the weekend!
Sunday, April 14, 2013
Baltimore regional part 1!
Oh I have had such a fab weekend. My upline Heather and I came to Baltimore for the Stampin' Up! Regional. I have so much to share but here's a quick highlight whilst I'm on my iPhone...
Heather at breakfast looking... Sleepy! And me with just some of the awesome swaps. Can you tell I have been super energised?


Heather at breakfast looking... Sleepy! And me with just some of the awesome swaps. Can you tell I have been super energised?
Monday, March 18, 2013
Actual Ninjago Invitation Tutorial!

1. Take an 8.5" x 11" sheet of Garden Green cardstock and cut it in half lengthwise. This means cutting the sheet to measure 4.25"x11", you end up with two halves, each a long rectangle. Score the card across at 5.5" and fold to make a card. The fold should be at the bottom so that you can slide the insert in. A quick pic for visual learners:

2. Making the eye hole: Grab a small oval punch/framelit and punch an oval in the top on one side only, around an inch from the top. Then, punch two 1" circles at either end of the oval cut, to give you your eye hole.


3. Making the head piece: Take Champagne Gold glimmer paper (silver would work too) and put it into the 5 petal punch (this is retired - that's a bit tragic!) so that you get 3 petals punched:


This is what you should end up with!


Cut a rectangle of Garden Green paper 2" x 4.25". Place this into your Woodgrain embossing folder & emboss using your Big Shot.


8. Doing the eyes - the faffy bit! - put your Daffodil Delight card into the wallet, to ensure correct placement of the eyes:


Finally, the brows. I cut some super-thin (1/16" or possibly even smaller) strips of Basic Black cardstock, ran them through the Xyron & cut them into equal-length chunks. Adhere those to the card at an angle and you're done!
Hope that helps if you are planning a similarly crazy party. Or even if you just have a Ninjago-crazed little guy in your life! Feel free to ask questions if I wasn't clear.
Subscribe to:
Posts (Atom)