Monday, March 18, 2013

Actual Ninjago Invitation Tutorial!


Sorry about failing to do this yesterday. Here it is for your delectation!

First up - a preview. The yellow bit slides out of the card and has all the info about the party below the eyes. I used Garden Green (for Lloyd / the Green Ninja) but of course you could use Real Red (Kai), Pacific Point (Jay), Whisper White (Zane) or Basic Black (Cole, my personal favourite Ninja!).

1. Take an 8.5" x 11" sheet of Garden Green cardstock and cut it in half lengthwise. This means cutting the sheet to measure 4.25"x11", you end up with two halves, each a long rectangle. Score the card across at 5.5" and fold to make a card. The fold should be at the bottom so that you can slide the insert in. A quick pic for visual learners:


2. Making the eye hole: Grab a small oval punch/framelit and punch an oval in the top on one side only, around an inch from the top. Then, punch two 1" circles at either end of the oval cut, to give you your eye hole.


3. Making the head piece: Take Champagne Gold glimmer paper (silver would work too) and put it into the 5 petal punch (this is retired - that's a bit tragic!) so that you get 3 petals punched:

Tip - hold the punch upside-down so that you can see what you're doing. Then take your largest circle punch (2 1/2"), and grab the 3-petal piece by the middle petal. Holding the circle punch upside-down, slide the piece into the punch so that you will get a nice curved base to the headpiece.

This is what you should end up with!


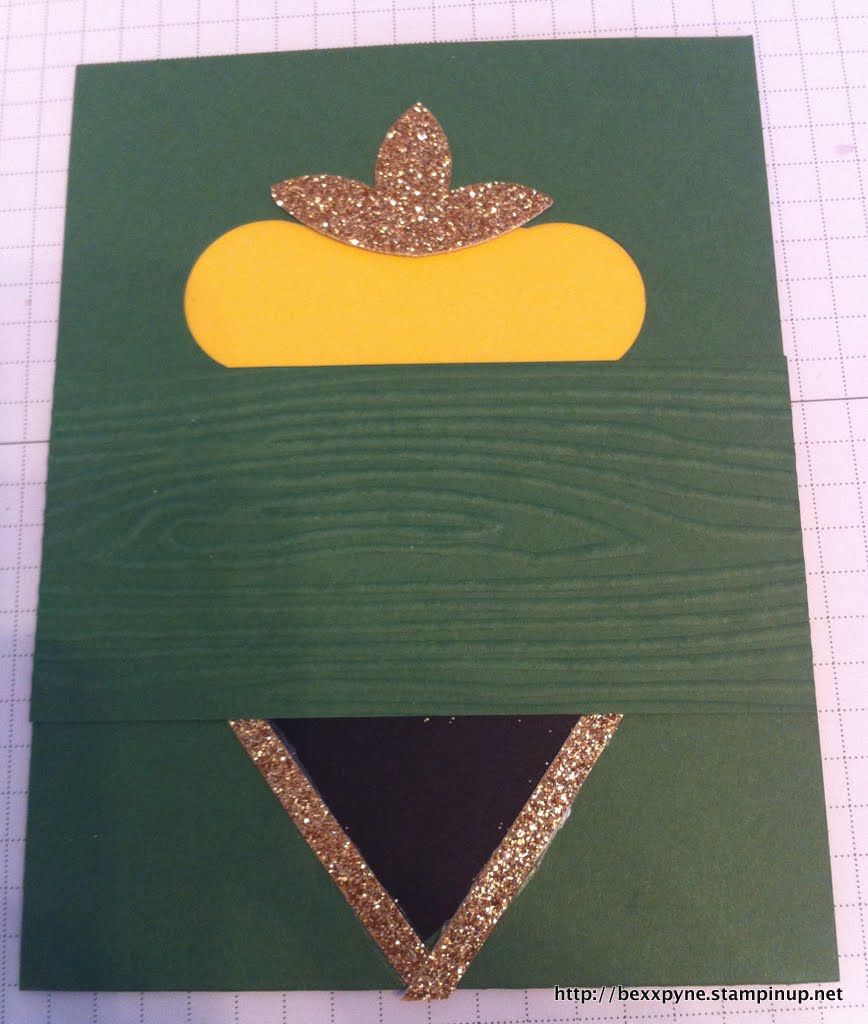
Stick this piece onto your card, having the bottom curve overhang the eyehole slightly to give that characteristic shape:

4. Making the shirt & collar: Using the Full Heart punch, cut a heart from black cardstock:

Adhere this to the card at about 1/4" up from the base fold:

Next, cut some 1/4" strips from your glimmer paper:
Use Tombow mono-multi to adhere them on, trimming once they are stuck down:

5. Making the headscarf:


Cut a rectangle of Garden Green paper 2" x 4.25". Place this into your Woodgrain embossing folder & emboss using your Big Shot.
Stick this firmly across the top of the heart, covering up the blobby bits (such a technical term!) AND the bottom of the eye hole:

6. Finishing off the "wallet" part - using your 1" punch, cut a semi-circular notch into the top of the back of the card, to allow the recipient to slide the insert out:

Then, using Snail adhesive, stick the two long-sides of the card to seal the wallet:

Ta-da! The wallet part is DONE:

7. Making the insert - cut a rectangle 3.25" x 5" from Daffodil Delight cardstock.

I then printed off the details of the party onto a 2.5" x 2.5" square of Whisper White card and adhered it to the bottom of the yellow piece. But I didn't take any pics because I don't want a million people at this blinking party! :D

8. Doing the eyes - the faffy bit! - put your Daffodil Delight card into the wallet, to ensure correct placement of the eyes:
Cut 2x 1/4" circles from Basic Black cardstock and stick in place. I used the my Xyron to do this as I had 24 of these to make:


Then, using your hand-held 1/8" circle punch, make the white specks from Whisper White cardstock and stick them on using 2-way glue:

See the spike tool with a grim-looking blob at the end? I grabbed a blob of used adhesive from my adhesive remover & stuck it to the end of the spike to help me control the placement of the white bits.

Finally, the brows. I cut some super-thin (1/16" or possibly even smaller) strips of Basic Black cardstock, ran them through the Xyron & cut them into equal-length chunks. Adhere those to the card at an angle and you're done!


Hope that helps if you are planning a similarly crazy party. Or even if you just have a Ninjago-crazed little guy in your life! Feel free to ask questions if I wasn't clear.


Sunday, March 17, 2013

Ninjago Invitation Tutorial

Wahoo! I got Jacob's party invitations finished. I also took loads of pictures and I am going to share a tutorial with you... Tomorrow. Bit of a dramatic day chez Spoon and I'm wiped out!

Here's a teaser!


Saturday, March 16, 2013

Crossing my fingers....

...for a CRAFTY SUNDAY!

Cleaned my floors today, did the groceries, changed the beds, did the laundry... what a fun Saturday! But hopefully it leaves me with a clearish run on Sunday crafting.

I am hoping to knock together some instructions for Jacob's birthday party invitations. I googled & Pinterest'ed "Ninjago Punch Art" without much success so I had a go at my own. My first ever punch art and I have to say, my nearly 5 year old was impressed so it must be kind of ok!

Also, my "Beautiful Basics" only has 3 spots left so get in quick if you fancy it! I am ruminating over some ideas at the moment... you may even see sneak peeks!

Wish me a good night's sleep and an obliging husband for tomorrow!

Friday, March 15, 2013

Beautiful Basics Class

Mark your calendars now - I'm hosting a Beautiful Basics class on 18th April.

"OK so you have a few stamps, a bit of paper & some cardstock. How do you take the next step & turn them into gorgeous hand-made cards? This class is for you if:

- you bought stuff and now don't remember what to do with it (!)
- you want some fresh ideas for making the most of your stamps
- you just need a little prod in the right direction
- you just fancy stamping, chatting & giggling with friends

Class is $10 (this covers the cost of supplies) and you will come away with 3 gorgeous cards. Please bring your own scissors & adhesive. Place an order of $25 (before shipping & handling) and your class is HALF PRICE. Place an order of $50 (before shipping & handling) and your class is FREE. Can't say fairer than that! :D"

 Let me know if you fancy it - I only have space for 5 stampers!


Saturday, March 2, 2013

Virtual Stamp Night

Oh, how I love Splitcoast Stampers! Every so often they arrange a "Virtual Stamp Night". The latest was yesterday evening and all day today (Theme: Bugs, Birds & Butterflies). Well, I didn't manage any challenges last night, and today I was flying solo with the boys all day while Stew worked, so I only got to start at 7pm. But it was still loads of fun & I love the cards I made!

MAR13VSNL was a challenge to use things beginning with B. Well, I included a few. How many can you count? :D

I had Jacob "helping" me with this one (cue lots of random small pieces of cardstock all over the floor). The stamp of the zeppelin (though it could also be called a Blimp!) is from Moving Forward, the Ronald MacDonald House set in the current SU! catalogue. Love, love, LOVE that set.

MAR13VSNM asked for a scene inspired by the rhyme "Incey Wincey Spider", incorporating some kind of weather, and a bug:

Shockingly that one isn't SUO, it isn't even close. Whenever I'm using stamps from another company, I always pair them with SU!'s cardstock, ink & accessories. They're just awesome quality and I wouldn't be without them!

MAR13VSNN emphasised that bugs aren't just for boys! The challenge was to make a girly, blinged up bug card:

Believe it or not, this was my SECOND attempt at heat embossing, and it still messed up. I ran out of time & couldn't do it again so I'll aim to fix it another time! I also used my precious stash of textured paper here... UPSIDE DOWN!!! The texture just doesn't show up well!

MAR13VSNO asked for the Cracked Glass Technique. And I gave up! I am too tired tonight to be running back and forth from the freezer... :D

With a bit of luck and a following wind, I might be able to get a few more challenges done tomorrow. But I have to say, there's nothing like doing them live!


Friday, March 1, 2013

A quick little thank-you

I wanted to design something to mail to my customers as a thank-you, and I am head over heels in love with this little guy.

I just love the Oh, Wave! wheel too. I am thinking about doing a wheel stamp class as I have a few but I feel they often get overlooked.


This is just a little 3.5" x 5" postcard I can throw in an envelope. I am not the most confident person on the phone (I think it's the accent, it's usually a mutual confusion-fest) so I vastly prefer mail! :D